Overview
From version 2.0 HIDmacros can execute scripts as macro actions. Any scripting language installed to windows active scripting can be used. Windows contain by default VBscript and JScript.
Application possibilities are extended with scripting support. Inside the script several special commands provided by HIDmacros application can be used. Putting all together typical tasks handled by scripts are
- extended keystrokes with windows management
- mouse events - single clicks, double clicks, all buttons
- windows script host - Shell or Network objects are accessible
- FSX events - any FSX event can be sent by HIDmacros command from script
- FSX variables - HIDmacros can monitor selected FSX variables and their values can be read by special command
- FSUIPC interface - access to FS variables
- buffer - simple input interface for scripts
- game devices - support for toggle switches
- game axis - read joystick position in script
- X-plane - read & set X-plane variables, execute commands
Architecture
Every macro can contain script source which is executed when macro is activated. Apart of these script codes there is one global section used for global definitions and initialization code. This section is accessible on Script page.

This is good place do define routines (procedures and functions) that will be used from macro scripts. Also any variable defined here is globally available in macro scripts. Global variables are usable for example for keyboard profiles. You can have global variable called e.g. PROFILE and based on its value (assigned by some macro = key on keyboard) other macros with script code can behave differently. This is used in scripting example described below.
There are compile buttons available to compile routines code or macro code. There is also Compile all button that
compiles routines code and all scripted macros. Macro script code must be compiled. Otherwise it is not executed when macro is activated.
There is also red/green indicator next to script window showing whether current code is compiled or not. Global indicator is located
in application status bar. If it says "Scripts compiled" it means routines code (the global code) and all scripted code in macros are compiled.
Technical note: As all the code is scripted the process behind is not real compilation. When you hit Compile button HIDmacros
just take the code and load it to scripting engine. Only syntax check is done at that time. But note that initialization code
in routines source which is not inside procedure or function is executed during compilation (load to scripting engine).
Keystroke sending
There are 2 possibilities how to send key sequence from script.
- HIDMacros command SendKeys: procedure has one string parameter with keys sequence. Format is exactly the same as used in macro definition.
- using scripting language possibilities. Some script languages have wrappers for Windows API calls - this is what HIDMacros do internally.
Following example shows both methods. The example is in VBscript.
'HIDmacros command
HIDMacros.SendKeys "+a"

'Windows way
Dim wsh
Set wsh = CreateObject("Wscript.Shell")
wsh.AppActivate "Notepad"
SendKeys "Hello"
On second example you can see how to activate some window using standard VB script command. When you work with Wscript.Shell object often in your macros, it's better to dim & create this variable in routines section.
The AppActivate method takes as parameter window title or its handle. If you're not sure what is window title, check titles of all currently visible windows on Script tools tab.
Mouse events
There is a command to send mouse click:
HIDMacros.MouseClick x, y, action
Parameters are:
| x | x coordinate |
| y | y coordinate |
| action | number saying what should be done at coordinates
|
All clicks returns mouse pointer to current position. It means mouse pointer moves to new position, performs operation (click or double click) and returns where it was before macro execution. For action 0 (mouse move) this return is of course not done.
A few words about delays. I've got many requests to include delays into keyboard sequence in HIDmacros. With scripting it's quite easy so there is a command HIDMacros.Sleep which takes number of miliseconds as parameter. However it's not that easy in reality. If you try to use delay together with key operations, you realize that Active scripting somehow delays keyboard messages and delay between keystrokes doesn't work. Whole execution gets delayed and keystrokes are sent at once. Mouse operations seem to work fine with delays so you can send e.g. 2 mouse clicks with delay between - giving some time to paint a menu for example. But there is one more problem. With delays and generally with scripting (loops) it can happen that macro execution takes quite a long time and HIDmacros gets blocked. My original plan was move script execution to new thread and keep HIDmacros to process other keyboard triggers. But it doesn't seem to be that easy to move all the DOM stuff around scripting to special thread, so this is my next plan and investigation. Until I have macro execution in threads, it's always your risk & responsibility to create quick macros. During macro execution another macro is not activated
So finally example of Start - Run activation at screen 1280x1024 with delay.
HIDMacros.MouseClick 49, 980, 1
HIDMacros.Sleep 600
HIDMacros.MouseClick 90, 875, 1
Windows Scripting Host
WSH can be used in macro script. Global object WScript is not available, but you can create WshShell and WshNetwork objects via CreateObject command.
In that case it is better to create such object in routines script
'Routines
Dim wsh
Set wsh = CreateObject("Wscript.Shell")
and in macro only call methods of this object
wsh.AppActivate "Notepad"
FSX events
FSX events can be sent also from script using command:
HIDMacros.FSXEvent event_name, parameter
Parameters are:
| event_name | name of the event as listed in documentation |
| parameter | some events can have parameter and its value is provided here. Use 0 when there's no parameter for your event. |
You can also send some text to FSX screen by command:
HIDMacros.FSXtext "Text to be sent"
Example for both commands:
HIDMacros.FSXtext "Setting NAV1 stand by frequency to 112.6"
HIDMacros.FSXEvent "NAV1_STBY_SET", &H11260
FSX variables
You can also read and write FSX variables through commands using SimConnect interface. However there are some limitations. Currently HIDmacros work only with float and sting values.
Reading FSX variable through SimConnect is not simple, because the interface is message driven. So you first ask SimConnect to send you values of some variable and then you receive messages when value changes. It means you must first tell HIDmacros that you will need some variable and only then you can read its value. Writing is easier, because here we don't need to wait for message with result.
So here are the commands for FSX variables management.
HIDMacros.RegisterFSXVariable var_name, var_units
HIDMacros.GetFSXVariable var_name
HIDMacros.SetFSXVariable var_name, var_units, var_value
Parameters are:
| var_name | variable name as listed in documentation |
| var_units | variable units as listed in documentation. Use "STRING" to read string variable. |
| var_value | value in units to be set |
Only some variables are writable. When possible it's better to use FSX event to control simulator. Variables should be registered only once, so routines section is good place. Do not register too many variables. Once variable is registered, FSX will send a message to HIDmacros every second when value changes, even if you don't read the variable. If you try to read variable that was not registered, you'll get 0.
Example, in routines:
'Routines
HIDMacros.RegisterFSXVariable "PLANE ALTITUDE", "FEET"
HIDMacros.RegisterFSXVariable "ATC MODEL", "STRING"
and in macro
' read
Dim MyVar
MyVar = HIDMacros.GetFSXVariable("INDICATED ALTITUDE")
if HIDMacros.GetFSXVariable("ATC MODEL") = "DHC-6" then
  HIDMacros.FSXtext(MyVar)
end if

' write
HIDMacros.SetFSXVariable "GENERAL ENG THROTTLE LEVER POSITION:1", "percent", 100
FSUIPC interface
With Peter Dowson's FSUIPC you can access simulator variables in similar way as with SimConnect for FSX. I would say Peter's interface is more "technical", but works with other simulators like FS2004 or FS2002. For all details about supported simulators, variables mapping etc please refer to Peter's web page and mainly FSUIPC SDK package.
HIDmacros brings several functions to read and write variables through FSUIPC. To use those functions FSUIPC of course must be installed.
HIDMacros.GetFSUIPCInt offset, size
HIDMacros.GetFSUIPCFloat offset, size
HIDMacros.GetFSUIPCString offset, size
HIDMacros.GetFSUIPCRaw offset, size
HIDMacros.SetFSUIPCInt offset, size, value
HIDMacros.SetFSUIPCFloat offset, size, value
HIDMacros.SetFSUIPCString offset, size, value
Parameters are:
| offset | variable's memory offset from FSUIPC SDK. |
| size | size of variable in bytes, also mentioned in SDK |
| value | value to be set |
Size parameter tells how many bytes will be read or written. For int functions (GetFSUIPCInt and SetFSUIPCInt) this can be between 1 and 8. For float functions only size 4 and 8 bytes is supported (float or double float). Function GetFSUIPCRaw read part of memory and return string representing memory dump. It means every byte is represented by 2 characters in hex format, for example byte 44 would be returned as 2C. By writing a string to offset 0x0D70 you can execute FSUIPC macro or LUA script (in registered version).
Example
' read
Dim isPaused
Set isPaused = HIDMacros.GetFSUIPCInt(&H262, 2)
Dim rawClock
Set rawClock = HIDMacros.GetFSUIPCRaw(&H238, 3)

' write
HIDMacros.SetFSUIPCInt &H262, 2, 1 'pause sim
HIDMacros.SetFSUIPCInt &H330, 2, 16096 'alt set 1006 mBars

' write string
HIDMacros.SetFSUIPCString &H3380, 128, "Hello world"
HIDMacros.SetFSUIPCInt &H32FA, 2, 5
Input buffer
Sometimes you need enter some value for your script. You may wish to enter how many times macro action will be repeated. Or you may wish to enter numeric value and then use it to set heading in flight simulator. Or tune some radio.
There's special buffer built in HIDMacros. It can be set by script or directly from keyboard. Its value is accessible via script commands.
To set buffer content via keyboard you have to define new macro for each key and as action choose "Send to buffer".
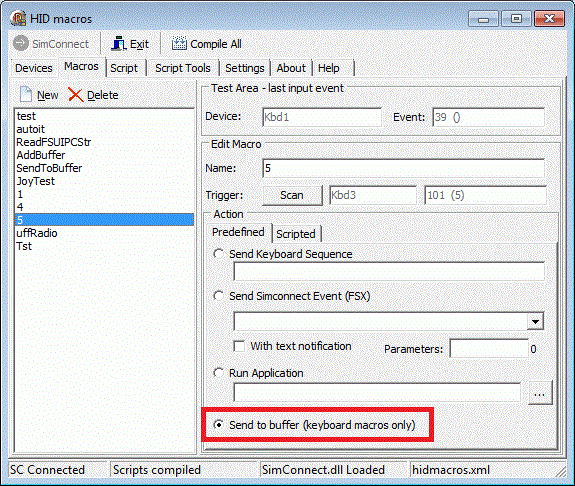
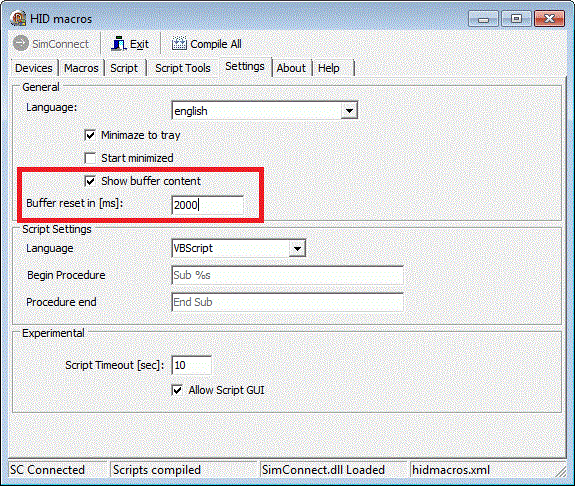
So if you define such macro for example for numpad "3" and then hit this key, value "3" will be added to the buffer. In settings tabs you can define if buffer content is shown or not. If content is shown the buffer value will appear in application title in task bar. If application is minimized to tray content is shown as baloon hint.
In settings you can also choose if buffer content should be cleared after some timeout. In this case you press keys and add values in the buffer. Once you stop adding content in the buffer, its value is cleared after defined period of time. The value is entered in miliseconds and 0 means buffer is never cleared automatically. In this case you must clear the buffer using script command.
There are several commands available for buffer operations:
HIDMacros.GetBuffer 'gets buffer content as string
HIDMacros.SetBuffer value 'sets whole buffer to value
HIDMacros.AddToBuffer value 'adds value to the end of buffer
HIDMacros.ClearBuffer 'clears buffer
HIDMacros.StrRPad value, append, count
StrRPad is string padding function that adds append char to value string to have count characters. If provided string is longer than count, it's truncated from left.
Example
' suppose we have numpad numbers defined as "send to buffer"

' set heading
HIDMacros.FSXEvent "HEADING_BUG_SET", HIDMacros.GetBuffer

' set NAV1 stand by frequency
Dim frq
frq = HIDMacros.GetBuffer
frq = HIDMacros.StrRPad(frq, "0", 5)
HIDMacros.FSXEvent "NAV1_STBY_SET", "&h"&frq
Game devices
Game devices are supported because their buttons can be used as toggle switches (with permanent on or off position). To use this funcionality in scripts there is special method:
HIDMacros.IsButtonPressed DeviceName, ButtonNumber
Parameters are:
| DeviceName | Game device name from Devices tab |
| ButtonNumber | Button number, starting from 1 |
Example
' set NAV1 or NAV2 radio based on toggle switch
if HIDMacros.IsButtonPressed("Saitek X52 Flight Controller", 13) then
  HIDMacros.FSXEvent "NAV1_STBY_SET", &h11450
else
  HIDMacros.FSXEvent "NAV2_STBY_SET", &h11450
end if
Game device axis
There is special function that returns position of game device axis (e.g. joystick position).
HIDMacros.GetAxis DeviceName, AxisName
Parameters are:
| DeviceName | Game device name from Devices tab |
| AxisName | Name of the axis (e.g. X, Y...) |
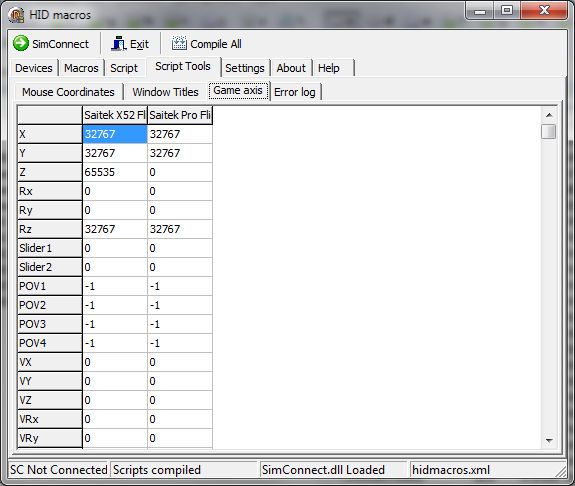
Of course you have a question: What are the names of axis that my joystick supports? The answer is easy: check yourself. Switch to Script support tab and Game axis sub-tab and see all possible axis names that HIDMacros recognize and moving you joystick you can see what is the axis name and what are possible values.
Want more? It's nice to read axis value in the script when button or key is pressed. But what if you need to control something directly with axis. What if axis movement could call a script...
Sub AxisXChange(dev, axis, val)
  Dim Message
  Message = "Axis " & axis & " of device " & dev & " moved, value is " & val
end sub

HIDMacros.RegisterAxisEvent "Saitek X52 Flight Controller", "X", "AxisXChange", 5
With RegisterAxisEvent you can tell HIDMacros to call some procedure present in routines section every time when axis of your game device changes by some delta value. Parameters are:
| DeviceName | Game device name from Devices tab |
| AxisName | Name of the axis (e.g. X, Y...) |
| ProcedureName | Name of procedure present in your routines section. This procedure is called with 3 arguments: device name, axis name and axis value. For 1:1 registration parameters can be redundant, but you can register more axis to call one procedure and then it's quite usefull to see what axis has changed. |
| Delta | After what change of axis value the procedure is called. Choose bigger number for better performance (script is not called so often) and lower number for precise control. |
With this feature you can control more things with one axis, you can use keys to change axis meaning, you can set up your own null zones for axis etc. There's also similar function to unregister axis callback:
HIDMacros.RegisterAxisEvent DeviceName, AxisName
For most axis values provided by DirectX are between 0 and 65535. Usually you need to recalculate this value to your own range. There are 3 supportive functions:
HIDMacros.Axis2Int AxisValue, LowValue, HighValue
HIDMacros.Axis2Float AxisValue, LowValue, HighValue
HIDMacros.AxisRemap AxisValue, RangeLow, RangeHigh, LowValue, HighValue, DefaultValue
Function Axis2Int takes AxisValue between 0 and 65535 and returns appropriate integer value from interval between LowValue and HighValue. It means LowValue is returned for axis value = 0 (and close values) and HighValue for axis value 65535 (and close values). If LowValue is bigger than HighValue axis seems to be reversed. For axis value 0 you again get LowValue but it's bigger then HighValue this time. So rising the axis value you'll be getting lower numbers down to highValue. Axis2Float works in the same way but with float (fraction) values = no rounding to integer.
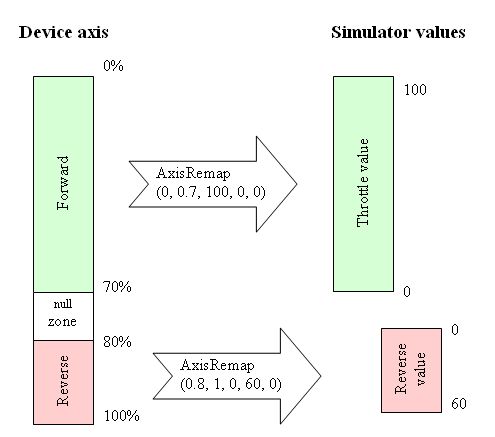
Function AxisRemap is used for mapping part of device axis to some range of values. It has following parameters
| AxisValue | Axis value between 0 and 65535 |
| RangeLow | Bottom range of axis that should be mapped. Float fraction value between 0 and 1 (e.g. 50% of axis range is 0.5). |
| RangeHigh | Top range of axis that should be mapped. Float fraction value between 0 and 1 (e.g. 50% of axis range is 0.5). |
| LowValue | Result float value that will be returned for AxisValue at RangeLow |
| HighValue | Result float value that will be returned for AxisValue at RangeHigh |
| DefaultValue | Result float value that will be returned when AxisValue is out of input range |
Example 1: Following example should make this complicated description more clear. Imagine we have throttle axis that should be mapped to forward throttle and reverse with some null zone between. Forward value (sent to simulator) is between 0 and 100, reverse value is between 0 and 60. And to make it more complex (however based on my real Saitek's throttle lever) let's have game axis returning 0 for fully extended lever (100% throttle) and 65535 for no throttle. If we want to map reverse between 0 and 20% then have 20-30% null zone and 30-100% throttle then AxisRemap should be called with those parameters.
Example 2: use joystick to emulate keyboard. Store letter to buffer and emulate key press on button.
' rotuines section
Sub Axis2Char(dev, axis, val)
  Dim CharCode
  CharCode = HIDMacros.Axis2Int(val, 122, 97)
  if (HIDMacros.GetAxis("Saitek X52 Flight Controller", "X") > 50000) then
    CharCode = CharCode - 32 ' capital letters
  end if
  HIDMacros.SetBuffer Chr(CharCode)
end sub

HIDMacros.RegisterAxisEvent "Saitek X52 Flight Controller", "Y", "Axis2Char", 5

' macro on joystick button
if (HIDMacros.GetBuffer > "") then
  HIDMacros.SendKeys HIDMacros.GetBuffer
end if
Example 3: map reverse to throttle axis in FSX. Don't forget to unassign axis in FSX, throttle is controlled by script only. AxisRemap is not used here to demonstarte how to calculate values in script.
' rotuines section
  Dim ZeroT
  Dim AxisPercent
  Dim FinalThrottle
  ZeroT = 0.2 ' bellow 20% apply reverse
  AxisPercent = val / 65535
  if (AxisPercent < ZeroT) then
    ' set reverse, which is negative throttle for FSX
    FinalThrottle = (AxisPercent-ZeroT)*100 / ZeroT
  else
    ' set throttle
    FinalThrottle = (AxisPercent - ZeroT)*100 / (1-ZeroT)
  end if
  HIDMacros.SetFSXVariable "GENERAL ENG THROTTLE LEVER POSITION:1","Percent", FinalThrottle
  HIDMacros.SetFSXVariable "GENERAL ENG THROTTLE LEVER POSITION:2","Percent", FinalThrottle
X-plane interface
X-plane variables can be read and set by script commands. List of accessible variables can be found in X-plane SDK.
From version 2.1 it is also possible to execute X-plane commands. Those commands are the same as in controls assignment in XPL. XPL commands can be executed via script command or directly in macro definition.
Important: For X-plane access special plugin must be added to X-plane which HIDmacros uses to exchange data. This plugin is file HidMacrosXpl.xpl located in xpl subdirectory of HIDmacros. You have to manually copy this file to X-plane Resources\plugins subdirectory.
Following methods are used for X-plane access:
HIDMacros.GetXplVariable pName 'returns variable content
HIDMacros.SetXplVariable pName, pValue 'sets variable content
HIDMacros.GetXplArrayItem pName, pIndex  'returns array item
HIDMacros.SetXplArrayItem pName, pIndex, pValue  'sets array item
HIDMacros.XPLCommand pCommand  'executes command pCommand
HIDMacros.XPLCommandBegin pCommand  'starts command pCommand
HIDMacros.XPLCommandEnd pCommand  'ends command pCommand
For array operations indexes are zero based. To find out array size, provide any negative number as pIndex. Strings are also supported in GetXplVariable and SetXplVariable. However X-plane offers only a few string variables.
Example
' get tail number (string)
var = HIDmacros.GetXplVariable("sim/aircraft/view/acf_tailnum")

' get flaps position (float)
var = HIDmacros.GetXplVariable("sim/flightmodel/controls/wing1l_fla1def")

' get current heading (float)
var = HIDmacros.GetXplVariable("sim/cockpit/gyros/psi_vac_ind_degm")

' get NAV1 active frequency (integer)
var = HIDmacros.GetXplVariable("sim/cockpit/radios/nav1_freq_hz")

' array example
' array size
var = HIDmacros.GetXplArrayItem("sim/cockpit/engine/fuel_pump_on", -1)
' fuel pump no 1 position (0/1)
var = HIDmacros.GetXplArrayItem("sim/cockpit/engine/fuel_pump_on", 0)
' fuel pump no 2 position (0/1)
var = HIDmacros.GetXplArrayItem("sim/cockpit/engine/fuel_pump_on", 1)

' set NAV1 frequency to 111.30
HIDmacros.SetXplVariable "sim/cockpit/radios/nav1_freq_hz", 11130

' set autopilot's heading bug to 190
HIDmacros.SetXplVariable "sim/cockpit2/autopilot/heading_dial_deg_mag_pilot", 190

' turn on both fuel pumps
HIDmacros.SetXplArrayItem "sim/cockpit/engine/fuel_pump_on", 0, 1
HIDmacros.SetXplArrayItem "sim/cockpit/engine/fuel_pump_on", 1, 1

'toggle landing gear
HIDMacros.XPLCommand "sim/flight_controls/landing_gear_toggle"
'engage starters
HIDMacros.XPLCommandBegin "sim/engines/engage_starters"
'release starters
HIDMacros.XPLCommandEnd "sim/engines/engage_starters"
Complex example
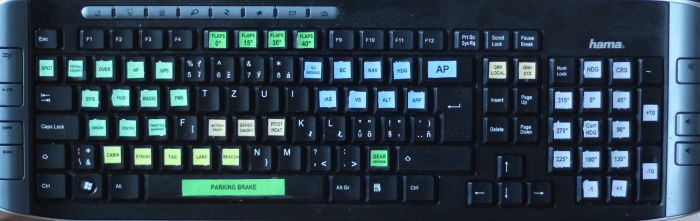
With my keyboard I used numeric pad to quickly set autopilot heading or VOR1 course bug to specific value.
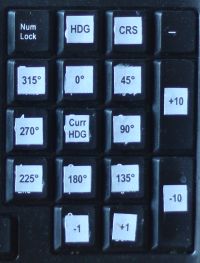
Buttons HDG and CRS at the top switch between heading and course bug, button Curr HDG sets value to current heading.
Source code below was copied from routines and macros for each key
.
' Routines:
Dim Mode
Mode = "HDG"

HIDMacros.RegisterFSXVariable "PLANE HEADING DEGREES MAGNETIC", "degrees"
HIDMacros.RegisterFSXVariable "AUTOPILOT HEADING LOCK DIR", "degrees"
HIDMacros.RegisterFSXVariable "NAV OBS:1", "degrees"

Sub SetHdgCrs(value)
  if Mode = "HDG" then
    HIDMacros.FSXEvent "HEADING_BUG_SET", value
  end if
  if Mode = "CRS" then
    HIDMacros.FSXEvent "VOR1_SET", value
  end if
end sub

function CurHdgCrsValue()
  CurHdgCrsValue = 0
  if Mode = "HDG" then
    CurHdgCrsValue = HIDMacros.GetFSXVariable("AUTOPILOT HEADING LOCK DIR")
  end if
  if Mode = "CRS" then
    CurHdgCrsValue = HIDMacros.GetFSXVariable("NAV OBS:1")
  end if
end function

' Macro heading 0
call SetHdgCrs(0)

' Macro heading 45
call SetHdgCrs(45)

' etc

' Macro set as current heading
Dim CurHdg
CurHdg = HIDMacros.GetFSXVariable("PLANE HEADING DEGREES MAGNETIC")
call SetHdgCrs(Round(CurHdg))

' Macro +10
call SetHdgCrs(Round(CurHdgCrsValue()+10))

' Macro +1 - the easiest way
if Mode = "HDG" then
  HIDMacros.FSXEvent "HEADING_BUG_INC", 0
end if
if Mode = "CRS" then
  HIDMacros.FSXEvent "VOR1_OBI_INC", 0
end if
My whole FSX keyboard is used mainly for Twin Otter offline flying. It's wireless and has those stickers:
XML configuration file for FSX can be downloaded here.